Broken Tool Detection In Machining And Turning Centers
Renishaw's TRS2 broken tool detection system uses a "one-box," single-head design to recognize tool reflections, bringing precise, in-cycle laser monitoring to machining centers and other machine tools.
Top Ten Ways To Improve A Machine Vision Process
Machine vision is an area that, if set up correctly, can reduce process inefficiencies. Here are specific steps that, without proper setup, can cause non-value-added downtime to the machine vision process.
Gaging Is Baseless Without Standards
Applying gaging standards consistently is the key to quality parts and products.
Work Flow Boosts With CMM Upgrade
This shop knew that it needed to upgrade its CMM capabilities. It was going to take a couple of DCC CMM machines with varying work envelopes and a common comprehensive software package that the technicians as well as machine operators could easily be trained on. The company initially made some inquires with CMM manufacturers, and Xspect Solutions, the North American representatives for Wenzel CMMs, was the first company to respond.
Faster Measurement Of Complex Parts
As workpieces become more and more complex, with numerous critical dimensions that must be correct because they often relate to other features of the part, many of the tried-and-true measurement tools can slow down the production process.
Could You Repeat That?
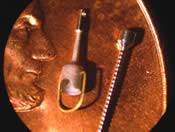
The extremely small, complex devices used in procedures to restore hearing loss require high-precision, tight-tolerance production. This company has found the right combination of machine tool technology and quality assurance to make it work.
#micromachining
Gaging Interest In Wireless
One area where wireless might provide an attractive alternative to wired solutions is in gaging for quality control. Collecting and analyzing data is becoming more and more pervasive.
Volumetric Measurement For Practical Positioning Accuracy
Using a conventional laser interferometer to measure the straightness and squareness errors can be difficult and costly. The process can require days of machine downtime, even with an experienced operator performing the measurements. To address the need for faster, more accurate machine calibration, Optodyne, Inc. (Compton, California) has developed a laser vector measurement technique for the 3D volumetric positioning error measurement.
Reduce Nonconformances With Automated Inspection
Are you tired of receiving phone calls from your customers requiring you to have a third-party sort? Perhaps you’re finally tired of having to deal with thousands of parts returned to you for sorting because of one or two nonconforming parts that made it through your system. You’ve made up your mind to eliminate this nonsense once and for all—but how?
Optical Measuring System For Shaft-Type Parts
For instant results in measuring form, dimensional and positional tolerances of shaft-type parts in submicron detail, Detroit Precision Hommel has introduced the Opticline non-contact CNC shaft gaging system.


